Epsilon Notes Help

Contents
Introduction
Epsilon Notes is a program for writing formatted texts, so your texts look nice and professional. It uses a marking method called “Commonmark”, which takes only a few minutes to learn. You can read about Commonmark after the description of the functions of Epsilon Notes.
==Download Epsilon Notes== from ++Google Play++ only to have the latest version.
The current help is not complete due to recent updates. Read more in Menu → Help → What’s new.
Description(说明)
File Manager(文件管理器)
Formats: Epsilon Notes can read and save text files (.txt, .md, .cm, .markdown, .mkd).
Access: To open the file manager, swipe from the right side of the screen to its center.
Unaccessible folders: Some folders are not accessible in Android 6+. If Epsilon Notes cannot read a folder, it will propose opening one of the default folders.
Width: To change the file manager width, select it in the Preferences.
Context menu: Long-press a filename to access more functions, such as “rename”, “delete” etc.
Sorting: Files can be sorted by name or time. The time of file changes is shown under the file name. You can hide this field via the Preferences.
Buttons: The file manager has a few buttons at the top: * Context menu * Default folders * Lock * Index * Sort * Search
Context Menu button long click changes the width of the file manager.
New file: When you open the file manager, you will see the round button with a plus (+). Use it to create a new file.
File manager as Home screen: You can use this program to create your personal Wikipedia with wiki-links between files. So, when you open the Epsilon Notes, it starts with the last page that you opened last time. From that page you can navigate to other pages by clicking on the links that the page has. But if you want to see the File Manager first, go to the Preferences and turn on the option File manager as Home screen.
Copy and paste: Currently, Copy and Paste works only in Internal Memory.
To copy files, make a long click on the filename. You will see a menu and “Copy” option.
To paste that file, go to the top menu of the File Manager and choose “Paste” there.
Note: folders can be copied only if they are not empty.
Here is the scheme:

Preview of non-commonmark files: in the Preferences, there is a “File Launch Filter”. Use this option to launch files when you press links, such as [My puppies](my_puppy.avi) (a movie link). These files appear in the File Manager on a blue background. If you make a long click on these files in the File Manager, you can launch them for a preview.
Back button returns to the previous document of the current session.
To exit the app instead of navigating back - make a long tap on the BACK button.
Index file(索引文件)
Home page for your folders: If you are working on a project in a folder, create an index file there with the default extension (index.md - for example). The file will open automatically when you enter the folder. You can use this index file as a home page. You can turn off this function the Preferences or in the File Manager (index button).
Note: the index file must have one of the default extensions (.txt, .cm, .md, .markdown or .mkd). Epsilon Notes will open the one that it finds first among:
- index.md
- index.txt
- index.cm
- index.mkd
- index.markdown
Reminder about links: When you write a link to another Commonmark file, you do not need to specify its extension (.md, .txt etc.). It will open the first file it finds, or will try to create a file with the default extension selected in the Preferences.
Toggle opening index file: Use an index file in a folder with a home page containing links to other documents in the folder. However, this function may interfere with other functions, such as moving the currently open file. In this case, you can turn off opening the index file by pressing the “Home” button at the top of the file manager.
Index Panel (The left sliding panel for index / contents / favorites links )(索引面板)
Index panel description(索引面板说明)
Epsilon Notes has a left sliding panel(滑动面板). Use it to create your own menu with links to your favorite files.
To do that, go to Preferences and copy the contents of a file with your links. To fill the index panel, use Commonmark just like in any other Commonmark file.
Here is an example of how people use the Index Panel.
The text copied to the Preferences:
Tap on the picture to see it in the browser

The same text rendered as side menu in the index panel:
Tap on the picture to see it in the browser
Global index panel path:
Instead of providing markdown text in the Preferences → Global Index, you can provide path, in the format:
file:///storage/1234-ABCD/.../file.md
Global index vs. local index: You can toggle the left panel contents. One is Global Index and the other is Local Index.
You fill the Global Index through Preferences.
The Local Index is filled from the Index file in the current folder.
Usage:
Suppose, you work on a large document of 200 pages. It may be difficult to navigate through it by always returning to the Table of Contents.
Consider placing that document to a folder and breaking it into a number of small documents, and add an index file (index.md) with links to all those documents. This index file will open when you enter the folder and will appear in the left panel under the Home button.
In other words, you can have general and context based indexes.
Note: the local index is read only when the local index panel is active. No worries about redundant operations. If you don’t open it, the index file is not read into it.
Index Panel Photo(索引面板图片设置)
The index sliding panel has an image.
- If you are in the habit of keeping a photo of your beloved ones or your favorite city in your wallet, you can replace this photo in the Index panel with your photo.
To change the picture in the Index Panel, long press the current picture. Use small compressed pictures.
Or, provide the picture path in the Preferences → Global and local index panel → Index panel image path, as follows:
file:///storage/emulated/0/.../myimage.jpg
Note: On older devices, if you do not see the picture, try compressing it.
For efficiency, it is recommended to use smaller compressed pictures.
- If you don’t want photos, you can disable the field by checking the setting in the same Preferences section.
Storage on external SD for unrooted devices in any folder(可存储到没有root的设备外部SD卡的任何文件夹中)*
* Available in Premium Version
You can store files on your external SD card. To do that, go to the Preferences, select Get SD Access and point to your extetnal SD.
Tap on the picture to see it in the browser
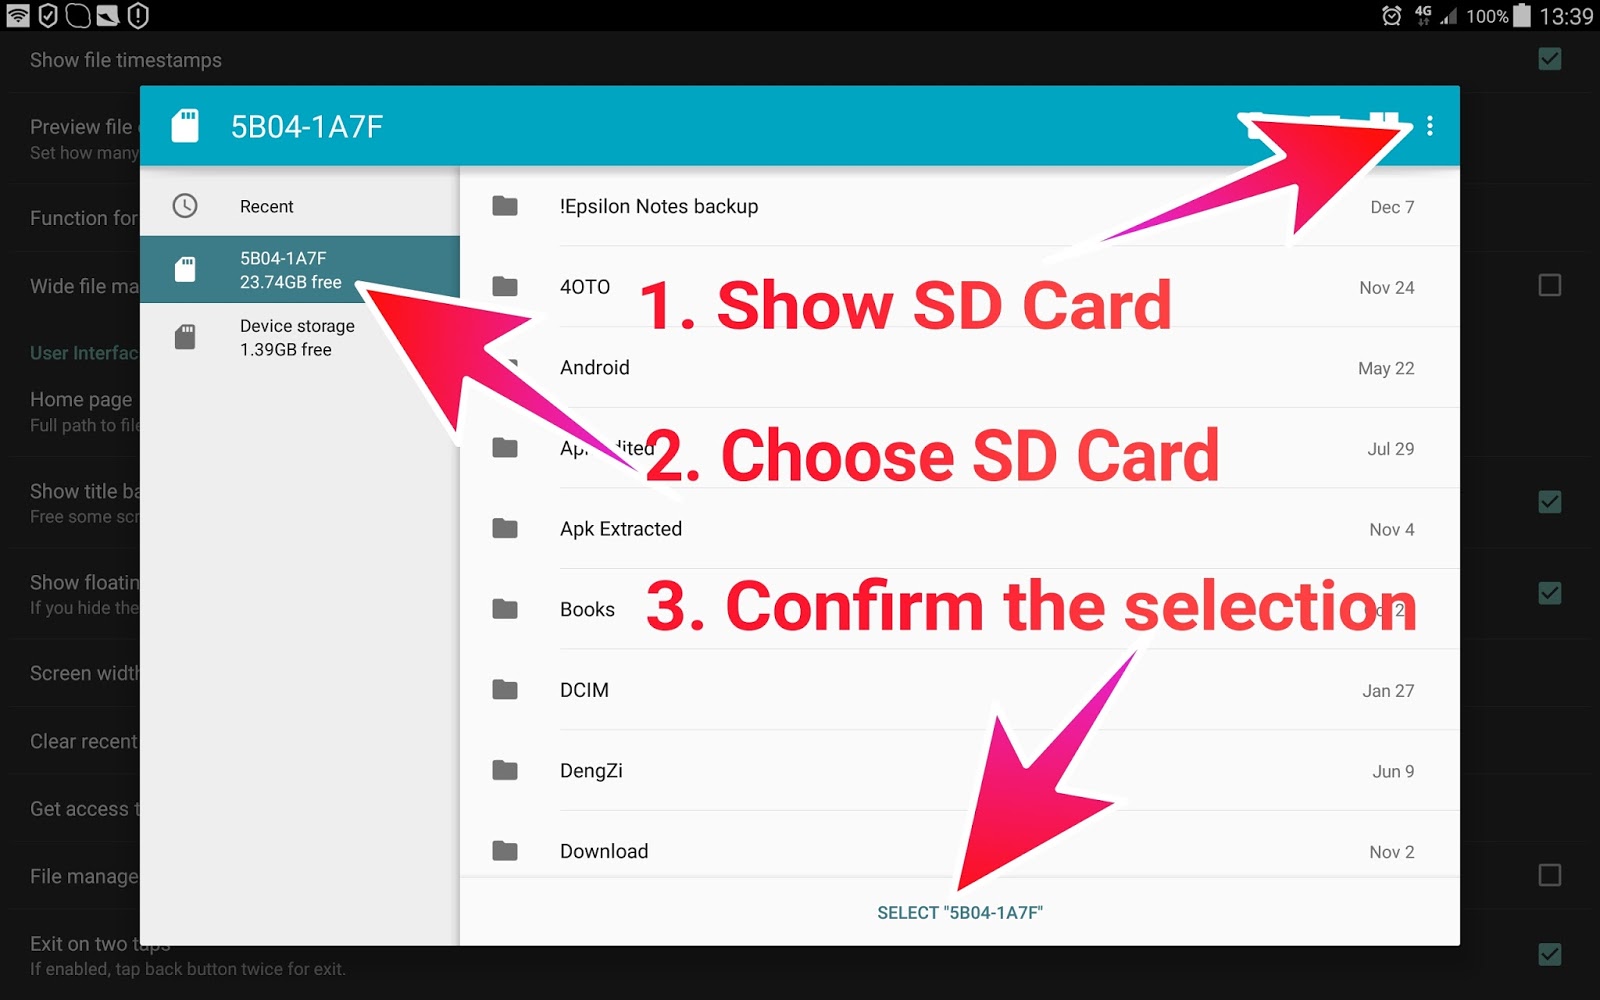
Note: The picture may differ depending on your device.
There are a few remarks on external storage in the Q&A section of What’s New. Please, read the remarks too if you need to write to an external memory card.
Home page(主页)
When you launch the app, it opens the last file. You can set the home page file in the Preferences, which will open when the program is started. The path provided in this option must be full, for example:
file:///storage/emulated/0/MyNotes/homepage.md
If the app does not find the homepage at the specified path or if this option is empty, it will open the last document instead.
So, now, you can make a homepage with links to other documents, which will be launched when you start Epsilon Notes.
Directory lock(目录锁)
Directory lock: In the file manager’s top menu, there is an option lock / release folder, which fixes the current folder as a working folder. You cannot leave the folder, until you release it. When the directory is locked, the exit path disappears.
File launch filter(文件启动过滤器)
- When you make a link to a file, which is not supported by Epsilon Notes, the app adds the default extension. If you have
.mdas the default extension and you click on[Video](file:///storage/extSdCard/Video/MyLovelyPuppy.mov), instead of running the videoMyLovelyPuppy.mov, Epsilon Notes will try to open a fileMyLovelyPuppy.mov.md.
To avoid that behavior, add the “mov” extension to the File Launch option in the Preferences. The format is (for example):
.avi,.mp4,.xls,.doc,.pdf,.mov etc.
If links with these extensions are clicked, Epsilon Notes will try launching an outside program to run those files.
Files with extensions specified in the File Launch Filter appear in the file manager, too. When you click on the name of such file, path to it is copied to Clipboard and is ready for pasting in your Commonmark document.
Things to bear in mind:
- Android file system is case-sensitive. So,
/storage/extSdCard/is not the same as/sToraGe/ExtSDCaRD/. - Add extensions to the list in the Preferences preceded by ++a dot++ and separated by ++commas++ without any additional symbols, like spaces.
- You cannot use spaces in links. Write
[My kitty](my%20kitty.avi). Do not write My kitty.
Text files filter(文本文件过滤器)
In the Preferences, you can specify (in the Text Files Filter 文本文件过滤器) what files should be treated as simple text files and edit them with Epsilon Notes.
Suppose, you need to edit your .css files in Epsilon Notes. You can add this extension to the filter, if it is not yet there, and edit .css files in Epsilon Notes
Preferences Backup(重置个性化设置) ☆
You can backup your preferences before reinstalling Epsilon Notes and then restore them. If you use an external SD card, you need to point to you SD card again, as permissions cannot be backed up.
View Modes(视图模式)
The processor has three main modes: reading, html-viewing and editing.
When you create a new file, if it already exists, Epsilon will not allow you to overwrite it. Create a file with a different name, or delete the old file.
The symbols frequently used in Markdown are available on the symbol bar above the on-screen keyboard.
The edited line is centered (this fuction can be disabled via Preferences). This option allows you to see always part of the edited text before and after the edited line, so you can better concentrate on the idea of the edited paragraph.
Width of the edit and view screens may be narrowed for wide screens, improving the comfort of working on wide tab screens (via preferences). If you use a tablet, try setting the screen, say to 90%.
For compatibility with Commonmark referencing to files, spaces in newly created and renamed files are replaced with underscore. ==Avoid using spaces in file names==, otherwise browsers will need to render them to %20 format, which is inconvenient and may cause stumbling from time to time.
Recent files(最近浏览文件)
Access: You can get the list of recent files by selecting “Recent Files” option (Replay button) in the menu. Press back to exit the Recent Files screen.
Clear list: You can clear the recent files list via the Preferences
Exit: Press back to return to your document.
Timely clearing list of recent files: The program saves at most 100 items of the list when you exit the program.
HTML Export(导出为 HTML 文件)
You can export generated HTML code to the current file directory. Go to Menu->Export HTML
Reader mode(阅读模式)
You can activate the reader mode through the Reader mode button in the left index panel. In this mode, only the view screen and the file browser are accessible.
To activate the edit round button (+), while in the reader mode, double tap in an empty place on the screen.
Edit Mode(编辑模式)
Statistics(统计)
You can see the text statistcs (symbol and word counts) at the top of the edit screen. In the Preferences, you can set the appearance of the Text Statistics bar (none, small, normal)
Edit mode fonts(字体设置) ☆
You can set various fonts for Edit mode in the Preferences:
| Font name | Description |
|---|---|
| Monospace | Default font. |
| System | Your device’s normal font. |
| Dotted space | Monospace font, which allows you to control the invisible spaces at the end of line. |
| From file | Download your font, for example, from here, unzip it and provide the full path to the font in the setting Font file path. |
Save button(保存按钮)
There is a round save button in the Edit mode. You can turn it off in the Preferences, if it bothers you writing. Its functions are duplicated by the Back button.
Exit without saving(不保存退出)
Symbol Bar No. 2 has a button for canceling the editing.
Edit mode wrapping(自动换行)
Edit mode word wrapping: if you have a lot of tables, then the automatic word wrapping in the Edit mode becomes inconvenient. You can disable it in the Preferences.
Search bar(搜索栏*[编辑模式里的搜索栏只能搜索定位显示一个目标内容,比非编辑模式的搜索功能要差]*)
If you work with a long text and you need to navigate quickly to some specific point, you can use the search bar at the top of the edit screen. Search is case-insensitive.
You can delete the search bar contents by tapping on the × sign on the right.
The main goal of the search bar is to make editing long documents as easy as possible, so use the Search Line whenever you need to make a quick jump to some part of the text in the edit mode.
Light Edit mode(简易编辑模式)
(This mode is set via Preferences)
You can use this mode, if you want a faster and simpler editing experience without glitters and frills.
If enabled, this mode will: - disable the statistics display(关闭统计显示功能) - disable text centering(关闭文字居中功能) - disable undo/redo(关闭撤销/重做功能) - disable live-preview(关闭实时预览功能) - disable all keyboard hotkeys (Ctrl+A etc.)(关闭所有快捷键功能)
Note on very large texts:
On a mobile device, it is advised to break heavy documents into smaller ones (10-15 pages, max.), and to use the Local Index Panel for navigation between the chapters kept in a folder. Reader behavior research advises that articles should be 2000-3000 words.
Smaller texts are easier to manage and read. Besides, they consume less memory, require less operations, open fast and save battery.
However, if you still prefer handling gigantic texts, to speed up the keyboard response, you are advised to enable the Light Edit mode.
Warning: If the text size is abused, the keyboard may stop responding and out of memory problem may occur.
Symbol bars(符号条设置)
If you have forgotten what a symbol button means, you can make a long tap on the symbol button icon to see a popup hint.
- You can customize up to 6 symbol bars:
For example, one for Commonmarks, another one for math symbols (use Unicode). Separate symbols with a comma.
The symbol bar setting has a few reserved words.1
Two symbol bars can be restored to their default values. The other 4 bars are at your full disposal(任你分配).
To switch between symbol bars, use the rightmost button with its number.
You can change the width of the symbol bar buttons. The width ranges between 0 and 30. If the width value is out of this range is entered, then the middle value “15” will be used.
- To change the width, make a long tap on the button with the number of the symbol bar.
You can create empty space between buttons with the help of a comma. For example:
A,B,C,,D,Ewill produce an empty space between buttons C and D.
You can edit the Symbol bar from the Preferences and from the Edit mode. To edit the Symbol bar symbols, long press the rightmost button with the number of the current symbol bar.
You can also customize the icons (symbols), which appear on the symbol bar. Suppose, you are writing a scientific article on the French history, and your key word is
"anticonstitutionnellement"
and, suppose, you need to write this long word 2500 times throughout your article. You could add this word to the symbol bar via the Preferences, but then it would take too much space in the symbol bar. So, you can use one or two symbols to hide the whole word on the symbol bar. The format is
SS:TEXT
Where SS stands for the symbol (1 to 4 max) to appear on the bar, and TEXT is the text that will be sent, once you press on that symbol. Thus, you can write in the settings of the symbol bar among other shorcuts:
P1:anticonstitutionnellement
In the Symbol Bar you will see P1 appear, but as soon as you press on it, it will produce
anticonstitutionnellement
to your text.
To cut it short: if you enter the following line in one of the symbol bar settings:
Hello,bye,$,LW:long word
You will see on the symbol bar
Hello bye $ LW
When you press on these symbols in the Editor mode, the editor will type:
Hello by $ long word
i.e. the “long word” will be hidden behind LW.
Comma and Enter in Symbol bar
Comma is used to separate the symbols in the symbol bar settings.
To add commas and enter (line feed) symbols to your symbol bar, use:
\\, and \\n or \\r
\\n will send Enter and two SPACES to your document.
\\r will send only Enter (for using in codeblocks and YAML for example).
For example:
fw:Sincerely yours\\,\\nEugene
will produce a fw (farewell) symbol on the symbol bar, pressing which will send your document the text:
Sincerely yours,
Eugene
Symbol bar reserved words:
Symbol bars have reserved words. For example: BOLD, ITALIC, UNDERLINE, STRIKETHROUGH, HIGHLIGHT, SUPERSCRIPT, CODEBLOCK, FONTCOLOR, which correspond to the formatting presets:
BOLD, ITALIC, ++UNDERLINE++, STRIKETHROUGH, ==HIGHLIGHT==, ^^SUPERSCRIPT^^, CODEBLOCK, FONTCOLOR.
With these buttons it easy to combine several commonmarks. Just press them one after another. For example:
**_++~~bold, italic underline and strikethrough~~++_**
will produce
++bold, italic underline and strikethrough++
- The font color icon will produce the text:
<font color=""></font>. To make GREEN TEXT, fill in the preset as follows:html <font color="green">GREEN TEXT</font>
See the list of available color names here.
Line quick selection icon: This icon selects line from the current position to the nearest enter sign.
Make frequent use of this button when you need to move paragraphs from one part of the text to another. Now, you can do everthing with the help of the symbol bar - like: select several lines, cut them and paste elsewhere.
SORTLINES button:
To sort a few lines, place the cursor at the beginning of the line, select the lines using the QUICKSELECTION button, and press the SORTLINES button.
To perform reverse sorting, make a long tap on the button.
Recommended use: bullet lists and table lines.
Preview in Edit Mode: The PRINTPREVIEW button on Symbol Bar No. 2 can view your changes in the rendered view before saving or cancelling them. External links do not work in the preview mode.
If you want to restore your symbol bars, make a long tap on the button with the number of the Symbol Bar in the Edit mode and Reset symbol bars 1 and 2.
To Top and To Bottom: The symbols called “TOTOP” and “TOBOTTOM” are used jump to the top or bottom of the document, respectively.
Undo and redo: The symbols are called UNDO and REDO. These operations work well, but may interfere a little with the T9 function. So, if you have autocompletion on, the autocompletion may try “to participate” in the insertion of changes in the buffer from time to time. When the edit window loses focus (save or find operations), the undo/redo buffer becomes reinitialized.
Symbol bar operations
The position of each symbol bar is remembered when switching them during the edit session. Alternatively, you can set the position of each symbol bar to reset at each switching (via Preferences).
- Tap on the Number Button: * switch to the next Symbol Bar
- Swipe (touch&move) on the Number Button: * switch to the previous Symbol Bar
- Long tap on the Number Button: * Go to Symbol Bars settings
Replacement(查找替换)
Icon location: Symbol Bar No. 2.
Replacement uses Regex.
What is regex?(何为正则表达式)
Regex means “Regular Expressions”, that are used to make special replacements in the text. There is a lot of information on regex in Internet, for example at http://www.regular-expressions.info/quickstart.html.
If you enter this regex:
\b(c.t)\b
(where \b stands for word boundary, dot means any letter, and brackets indicate the group of letters No. 1)
and this replacement:
[$1]($1.md)
(where $1 means the first group of letters from the previous expression)
Then all 3-letter words starting in “c” and ending in “t” (cut, cot, cat etc.) will be converted into Commonmark links.
[cat](cat.md) [cot](cot.md) [cut](cut.md)
If you need help with Regex, join the Google+ community at: Google Plus Epsilon Notes Community.
Live preview(实时预览)
Available in Premium Version
The edit move has a live preview option for tablets. You can write your texts and observe their rendering in real time. The limit in the free version is 500 symbols
Tap on the picture to see it in the browser

To enable live preview - switch it on in the preferences or long press the Save button.
Nota Bene:
This function is not disabled for phones, so it is up to you to decide whether to use it or not on a small screen.
A few remarks on this mode:
- On small screens, you can use PRINTPREVIEW button on Symbol Bar No. 2.
- Live preview position is not synchronized with the edit field. You have to synchronize it yourself.
- Live preview is delayed a second after you stop typing to prevent lags in typing.
Preferences Menu
In the Prefereces menu you can set the following functions * Default file extension,which will be used whenever a file extension is needed, but not specified by the user (for example, when creating a new file) * Number of browser preview lines (1-4) * FLOATING BUTTON: show/hide * FONT SIZE: set the rendered font size and many others
Send note as attachment
You can send your note as attachment over email. (`Menu → Export → Send attachment”).
Epsilon Notes will add an instruction on viewing the file to the letter body.
CSS styles
Styling output:
You can style your output by inserting your style via Preferences. Examples of style:
To make pictures take only 20% of the screen:
img{width:20%;}
Center tag
To center a paragraph, use the following tags
<center>

***Centered paragraph***

</center>
which will produce:
Centered paragraph
Note: There must be empty lines before and after the tags.
Kbd tag
If you write a note about some keyboard shorcuts, use kbd tags. Writing <kbd>Ctrl</kbd> + <kbd>A</kbd> will render to Ctrl + A.
Default styles(默认样式)
There are 4 default styles, that are fully customizable.
- You can add one more style - “User Style”
- You can restore the default styles.
- You can switch among the styles from the Menu
Here is an example of one of the styles:
White Style
| Characteristic | Description |
|---|---|
| Aspect | High contrast white-paper, mostly black and white |
| Purpose | Enhanced visibility under light |
Instead of writing the whole style in the Preferences, you can provide the link to your style in one of the format:
file:///storage/sdcard0/....../your_style.css
http://www.your_site.com/your_style.css
https://www.your_site.com/your_style.css
Note: Path to style is supported only if it starts with a prefix such as http:// (several letters, a colon and two slashes). If your style file is in the Internet, it is recommended to copy it locally.
You can also use YAML to provide styles for individual documents. See here.
Styles and Edit Mode:
The activated style automatically changes the style of the Edit mode.
| Style | Edit mode |
|---|---|
| Day | Day |
| Night | Night |
| White | White |
| Black | Black |
| User | Select the setting in Preferences by checking / unchecking the box “Light theme in Edit mode” in the CSS section. |
Privacy(隐私设置)
You can use Epsilon Notes to store your private information.
The menu has an option called Security. Note encryption is AES + Base64 algorythm.
To encrypt your note, you need to set up the current session password and then encrypt it.
The security submenu has the following options:
- Peek: (Premium) Shows the current document unencrypted without saving it.
If your note was password protected, you need to enter the Session Password first. - Encrypt: Encrypts and saves your document.
- Decrypt: Decrypts and saves your document.
Session Password: Sets up the password used in the current session (valid until you exit Epsilon Notes).
Your session password is used to generate a unique AES encryption key.
The key and the password are kept in program current variables and they are not saved anywhere. When you exit the program, this data is deleted.
If you forget your password, it will be impossible to restore your encrypted note..
==Remember to backup important information.==
- When you set up a session password, a star will appear next to the title in the top bar, indicating that the password is active.
- If you do not set up the password, a password-free encryption will be used. You can use this encryption for a quick encryption, for example, before sending your text over email.
Privacy statement: Epsilon Notes does not send any data or files over Internet. It does not have any hidden permissions or activities. Epsilon Notes ++dowloaded from Google Play++ is safe for the privacy of the data on your device.
Sharing and Templates(分享&模板)
Share / Template
Sharing:
When you select text in Internet and share it to Epsilon Notes, you will be prompted to add a comment (which you may leave blank), and the shared texts with the comment will be saved to the folder storage/emulated/0/Epsilon (or a similar folder on older devices).
Go on reading articles and sharing text from time to time. All the shared texts are saved.
Later, when you return to Epsilon Notes, insert the shared texts in the Edit mode by pressing the INSERT button on Symbol Bar No.2.
After you insert the text, you will be asked to delete the file, only if its name is written in a timestamp format (e.g., 2017-01-18-11-48-23).
Files with other names in storage/emulated/0/Epsilon are regarded as permanent templates. So, you will not be prompted to delete them.
Templates:
You can use the storage/emulated/0/Epsilon folder to add your templates (save files with .text extension). Inserting the templates is the same as inserting the shared texts.
Note: if you do not see the .text files in the Epsilon folder, check if everything is fine with the Text files filter in the Preferences (no spaces, only extensions, including .text extension).
Markdownifying an internet article(网络文章 markdown格式化)
Markdownifying to the buffer(markdown格式化 到缓存区)
The best markdownifier is offered by the site:
If you are sharing a link to Epsilon Notes, there will be a button “Markdownify” in the dialog. When you press this button, Epsilon Notes will try to redirect the link to the above-said site and retrieve the text in markdown from there.
In case of instability(不稳定性), you can turn this service off in the Preferences.
Here is the scheme to use the Markdownifier(markdown格式化步骤):
- Open the browser
- Proceed to the site with an article that you want to copy to the Epsilon Notes buffer
- In the menu of the browser next to the URL bar, select Share…
- Select Epsilon Notes
- If you did everything correctly, you will have the option MARKDOWNIFY appear in the dialog.
- Select Markdownify
- Later on - when you are in Epsilon Notes again, use the INSERT button to import the markdownified article.
Shared data buffer in View mode
You can view the contents of the Shared data buffer through Menu > Buffer.
A tap on an item will copy it to Clipboard.
Commonmark(Commonmark语法)
Paragraphs and new lines(段落与换行)
For a new paragraph, press Enter two times.
Paragraph 1 (blablabla) [Enter]
                        [Enter]
Paragraph 2
You will see:
Paragraph 1 (blablabla)
Paragraph 2
To break a line, the line should end
(i) with two spaces or
(ii) with \ character.
Thus:
What is this life\
if full or care\
We have no time  [write 2 spaces at the end]
to stand and stare.
will result in
What is this life
if full or care
We have no time
to stand and stare.
The backslash \ character is also used to override any other Commonmark symbol.
Headings(标题)
If you write:
Heading 1
========
In the reading mode you will see
Heading 1
If you write
Heading 2
--------
You will see
Heading 2
Alternatively, you can use the # symbol followed by a space in the beginning of a line.
# Heading 1

## Heading 2

### Heading 3

#### Heading 4

##### Heading 5

###### Heading 6
Which will result in:
Heading 1
Heading 2
Heading 3
Heading 4
Heading 5
Heading 6
Links to headings
You can make links to headings based on the heading text, for example:
### My Heading

Lorem ipsum...

[Reference](#my-heading)
Thus will result in
My Heading
Lorem ipsum…
To convert a heading to a link, you should observe the following rules:
1) Use only one # in the link 2) All capital letters become small 3) All non letter symbols become a hyphen
Example, the link to a heading
# My Heading, Part 1
is
[Link](#my-heading-part-1)
If it is hard to write links to headings, use anchor tags.
Italic, bold, underline, strikethrough, highlight
To write text in italic, surround the italicized text with * or _ characters. To write text in bold font, surround the bold typed text with ** (two asterisks) or __ (two underscores) characters.
For underlining, use ++, and for strikethrough - use ~~, for highlighting - use ==, for superscript - use ^^
For example, if you write:
In this _text_ I use the *italic* font.\
In this __text__ , I use the **bold** font.\
And now I use ++underline++ and ~~strikethrough~~\
This text contains ==highlight== and ^^superscript^^
In the reading mode, you will see:
In this text I use the italic font.
In this text , I use the bold font.
And now I use ++underline++ and strikethrough
This text contains ==highlight== and ^^superscript^^
You can combine italic and bold by writing
- _**italic and bold**_
- __*italic and bold*__
- ***italic and bold***
- ___italic and bold___
all of which will produce: italic and bold.
Links, pictures, paths(链接、图片、路径)
To write a link, simply write it. For example, http://google.com will produce: http://google.com
- Pressing a link to Internet, opens the device’s browser.
To write a link covered with a name, use the format [name](http://link.com]. For example: [This link leads to google](http://google.com) will give you:
To make a link to a picture in the internet, use
 format. For example:  will result in:
![]()
You can add relative path to your pictures in the current folder: 
You can add relative paths to other Commonmark files:
* [File in this folder](my_file.txt)
* [File in subfolder](subfolder/my_file.txt)
* [File in superfolder](../my_file.txt)
You can insert pictures from your Gallery to your notes. To do that, press the image button on the edit-mode symbol bar.
You can view pictures by clicking on the picture name in the file browser. Press back to return to your document. After you view a picture, it’s path is stored in the ClipBoard, so you can paste it to your document.
When you long press an item in the file browser, the context menu will offer you to copy the absolute link to the file to Clipboard.
Links to files without extension(不用扩展,给文件添加链接)
- Normally, you write a link in the format
[Link](myfile.txt). It is not necessary to add.txtat the end of the file name. When the extension is omitted, the default file extension (.txt, .cm, .md, .mkd or .markdown) is added automatically, depending on the extension you have chosen in the Preferences. Thus, if you have set.mdas the default extension, clicking on the link “[File](some_name)” will send you to the filesome_name.md
Links to inexistent files(链接到不存在的文件,点击时会创建新文件)
- You can create a new file in the current folder by writing the name of an inexistent file:
[My New File](my_new_file.txt)and it will automatically be created once you try to click on it in the viewer mode. - You can use relative paths for inexistent files. Epsilon Notes will attempt to create a file, but the correct link back is not guaranteed.
- If it creates a lot of “garbage files”, you can disable this feature in the Preferences.
Links to sections in documents(链接到特定文档特定区域)
- You can make links to headings inside the document. See how.
- You can make a link to some section in another document. If the section exists, the document will be scrolled thereto automatically. The format of the link is:
[Link to Section](another_document.txt#section). - You can use headings in other documents as section names. For example, to make a link to the heading
### My welcomein a document calledHello.txt, write[Link to My welcome](hello#my-welcome)
Note on SPACES in links(注意链接中的空格)
- You must use URL format in links. It means you must use %20 instead of spaces!
Thus:
NO - [File in this folder](my file.txt)
YES - [File in this folder](my%20file.txt)
See details on Commommark specifications here.
Telephone links(电话号码链接)
You can make a telephone link in one of the following formats:
[My telephone](tel:+1-234-456-78-90)

<tel:+1-234-456-78-90>

tel://+1-234-456-78-90
which will render to one of the following:
tel://+1-234-456-78-90
In-text TOC(文档中间添加目录)
- You can place table of contents in any place of your document. Write
[TOC]preceded and followed by an empty line. The format is:
      <-- empty line
[TOC] <-- capital letters
      <-- empty line
Anchor tags(锚标签)
Anchor tag <a name=""></a> is one of the buttons in the symbol bar 2. The shorcut word for the anchor tag is ANCHOR.
To make links inside your document, you can insert an anchor tag at some point in your text and jump to that part of the text from other places. Commonmark standard doesn’t have a symbol for anchors. But you can use HTML in your text. The html anchor tag looks like this: <a name="tag_name"></a>. And you can make link to it by writing in Commonmark: [Some description](#tag_name).
It works this way:
<a name="my_anchor"></a>
### This is a heading with an anchor

Lorem ipsum... and all that stuff...

[Return to the heading with an anchor](#my_anchor)
will produce:
This is a heading with an anchor
Lorem ipsum… and all that stuff…
Go to the heading with an anchor
Quotes(引用)
To write quotes, use > at the beginning of the line.
For example:
> Eternity: a moment standing still for ever
>
> _James Montgomery_
will produce: > Eternity: a moment standing still for ever > > James Montgomery
Tables(表格)
To draw table, just “draw it”. For example, like this:
| Heading 1   | Heading   2 |
| ----------- | ----------- |
| cell   1    | cell   2    |
| cell   3    | cell   4    |
| cell   5    | cell   6    |
Or like this:
Heading 1   | Heading   2
----------- | -----------
cell   1    | cell   2
cell   3    | cell   4
cell   5    | cell   6
Which will produce:
| Heading 1 | Heading 2 |
|---|---|
| cell 1 | cell 2 |
| cell 3 | cell 4 |
| cell 5 | cell 6 |
You can position the contents of cells by placing a colon in the second line, indicating the position, for example:
| Left   | Center |  Right |
| :---   | :---:  |   ---: |
| cell 1 | cell 2 | cell 3 |
| cell 4 | cell 5 | cell 6 |
will produce
| Left | Center | Right |
|---|---|---|
| cell 1 | cell 2 | cell 3 |
| cell 4 | cell 5 | cell 6 |
Cells can vary in width and do not need to be perfectly aligned within columns. There must be at least three hyphens in each column of the header row.
| Aspect | Description |
| --- | --- |
| status | New document |
| difference | Awesome differences  |
Rendered table with varied cell width
| Aspect | Description |
|---|---|
| status | New document |
| difference | Awesome differences |
When you press Insert Table button, it inserts a “borderless” commonmark table tag, which is easier to fill in.
Fill it in as follows:
Header 1 | Header 2
  ---    |   ---
 Cell 1  |  Cell 2
 Cell 3  |  Cell 4
Surround tables with <noheader> and </noheader> tags if they should appear without headers.
Example:
<noheader>

 Any text | ...
----------|---
A         | B
C         | D

</noheader>
| … | … |
|---|---|
| A | B |
| C | D |
Code blocks(代码块)
To write code, use three backticks (```) in the beginning of the code and at the end of the code. For example:
```
procedure hello_world
begin
    writeln ("Hello world");
    readln();
end.
```
will show:
procedure hello_world
begin
    writeln ("Hello world");
    readln();
end.
Instead of backticks, you can use several ~ signs.
You can also write code by identing a line with four spaces. (Use TAB button for that).
For example, in the next block, each line starts with 4 spaces, instead of backticks:
10 CLS
20 PRINT "Hello world"
30 INPUT A$
40 END
Utility for programmers:
To highlight codeblocks in all documents, select the appropriate setting in
Preferences->Enable PluginsTo disable highlighting codeblocks in individual documents, add YAML:
---
code: none
...
When writing codeblocks, to help Epsilon Notes understand how to highlight it, you can specify the programming language. For example,
```java
public class HelloWorld {

    public static void main(String[] args) {
        // Prints "Hello, World" to the terminal window.
        System.out.println("Hello, World");
    }
```
will produce
public class HelloWorld {

    public static void main(String[] args) {
        // Prints "Hello, World" to the terminal window.
        System.out.println("Hello, World");
    }
to prevent highlighting, write none next to the three backticks:
```none
public class HelloWorld {

    public static void main(String[] args) {
        // Prints "Hello, World" to the terminal window.
        System.out.println("Hello, World");
    }
```
which will produce a non-highlighted code
public class HelloWorld {

    public static void main(String[] args) {
        // Prints "Hello, World" to the terminal window.
        System.out.println("Hello, World");
    }
Bulleted and numbered lists(项目符号和编号列表/无序有序列表)
Examples
++Bullet lists++
* Point 1
* Point 2
  * Sub-point 2.1
  * Sub-point 2.2

Or

- Alternative point 1
- Alternative point 2
  - Alternative sub-point 2.1
  - Alternative sub-point 2.2

Or

+ Alternative point 1
+ Alternative point 2
  + Alternative sub-point 3.1
  + Alternative sub-point 3.2
Any of which will produce:
- Point 1
- Point 2
- Sub-point 2.1
- Sub-point 2.2
++Numbered lists++
1. Point 1
1. Point 2
   1. Sub-point 2.1
   1. Sub-point 2.2
1. Point 3

Or

1) Point 1
1) Point 2
   1) Sub-point 2.1
   1) Sub-point 2.2
1) Point 3
will produce
- Point 1
- Point 2
- Sub-point 2.1
- Sub-point 2.2
- Point 3
It does not matter what number you write in a numbered list. It is numbered ==automatically==.
HTML(HTML 语法应用)
If some functions are needed, but not provided in this editor, you can use html directly in the text. For example, the html tag <font color="red"> text </font> is used to make RED TEXT .
Horizontal rule(水平线)
To draw a horizontal rule, write - - - or * * * on a new paragraph.
Footnotes(脚注)
- Footnotes. You can make reference to a footnote as [^footnote]. The reference back is the same, but with colon at the end [^footnote]: For example: the footnote [^comment] will look like this2.
Commonmark full reference(Commonmark 完整参考)
For full Commonmark referrence proceed to the link:
YAML(YAML 语法)
Using YAML headers tells Epsilon Notes what you need or you don’t need in your document. Especially, regarding the MathJax and ABC notation plugins. It is strongly advisable to use these headers, rather than the global settings of the Preferences.
To read about Mathjax and ABC, go to Menu → Help → For advanced users
Description(说明)
Note 1: You can disable the YAML title display settings in the Preferences.
Note 2: To see all available YAML properties, tap here
You can add some meta-data at the very beginning of the document in the format:
---
title: Mémoirs
author: Queen Elizabeth
description: Majestic biography
...
Or
---
title: Mémoirs
author: Queen Elizabeth
description: Majestic biography
---
This meta-data is not shown in the rendered mode, but can be used for your information, when you switch to the edit mode or as metadata for third-party Markdown processors, which support YAML.
This information is also used to switch on plug-ins and styles in your documents.
YAML and Plugins: Use Yaml, if you want to include some features only in some documents, and not in others. For example, if you have 5000 documents, of which only 3 documents use formulas or music notes, then ++it is better to turn off the MathJax and ABC Notation plug-ins in the Preferences and to turn them on only in the documents that use them.++ (See help on Mathjax and ABC in the help section for advanced users.)
To customize the view and plug-ins in one document, use YAML, or document properties, in the very beginning of the document in the following format:
---
property:value
...
or
---
property:
 - value 1
 - value 2
...
Epsilon Notes supports the following properties: title, toc, uses and style, and the following values:
- value for
title: the title of your document. - value for
toc: the title of the table of contents section. - values for
uses- mathjax
- abc
- values for
style- day
- night
- white
- black
- user
- nostyle
You can personalize style individually in files.
to refer to the stylesheet mystyle.css in the current folder
---
style: mystyle.css
...
to provide an absolute link to your style file.
---
style: file:///storage/emulated/0.../mystyles.css
...
to provide a link to your style in the Internet
---
style: http://www.mysite.com/mystyle.css
...
NOTA BENE: Clear cache!
When you change styles or use MathJax, the view, which shows the rendered document, caches some elements (for example, css and MathJax scripts loaded from external sources), so you can continue using these elements even offline. If you want css and MathJax to re-initialize, clear the cache. Menu → Clear cache
To read about Mathjax and ABC, go to Menu → Help → For advanced users
Title: If you want your document to show the title, write at the top of the document:
---
title: My Title
...
Table of Contents: If you want your document to have the table of contents based on the headings contained in your document:
---
toc: Name of the Table of Contents section
...
You can combine the properties, for example like this:
---
title: My Book
toc: Contents
...
which will generate the following text layout:
My book
Contents
- heading one - heading two - heading threeMain text…
If you want your document to use MathJax or ABC Notation, you have to write in the very beginning of the document:
---
uses: mathjax
...
or
---
uses: abc
...
if the document uses both MathJax and ABC notation, then write at the top of the document:
---
uses:
 - mathjax
 - abc
...
To read more about Mathjax and ABC, go to Menu → Help → For advanced users
If you want your document to be rendered in the day style, write at the top of the document:
---
style: day
...
Five styles are supported: day, night, white, black and user.
If you want your document to use MathJax, ABC notation and be rendered in the white style, write the following declaration at the top of your document:
---
uses:
 - mathjax
 - abc
style: white
...
Another example of using the individual document setting:
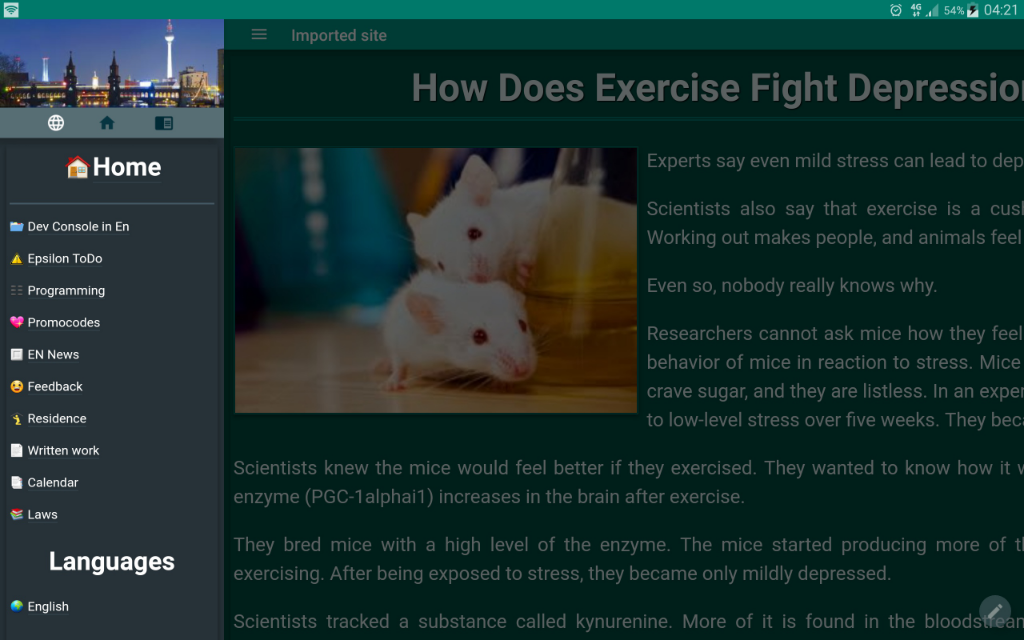
---
title: Psychology of White Mice
toc: Contents of the Article
uses:
 - abc
 - mathjax
style: white
...
This document header will generate the title and the table of contents at the top of the document, and will force Epsilon Notes to use ABC notation and MathJax rendering, and will apply the white css theme.
Once again, mind the YAML format, for example:
---
uses: abc
...
but
---
uses:
 - abc
 - mathjax
...
You can add date to your YAML header, which will be displayed at the top of the screen under the title.
---
date:2016-10-29
...
Use YAML for autonumbering headings (starting from level two)
---
heading: autonumber
...
Use YAML for headings to trigger scrolling to the top of the document when pressed.
---
heading: totop
...
Use YAML for material color styles!(用YAML制作实用颜色样式) ☆
Theme names(主题名称)
Premium Version ☆
Your documents can be painted to colors proposed for the Material Design here.
The names of the styles correspond to their colors.
Here are the extreme shades of the styles:
| red | red-light |
| pink | pink-light |
| purple | purple-light |
| deeppurple | deeppurple-light |
| indigo | indigo-light |
| blue | blue-light |
| lightblue | lightblue-light |
| cyan | cyan-light |
| teal | teal-light |
| green | green-light |
| lightgreen | lightgreen-light |
| lime | lime-light |
| yellow | yellow-light |
| amber | amber-light |
| orange | orange-light |
| deeporange | deeporange-light |
| brown | brown-light |
| grey | grey-light |
| bluegrey | bluegrey-light |
The free version contains only two colors for testing purposes:
blue
blue-light
All other colors are in the Premium Version
Using Themes with the help of YAMLs (借助YAMLs设置主题)☆
To paint your page into one of the material colors, you need to add the following YAML declaration at the top of the page:
---
Style: blue
...
Or any other color (in the Premium Version). For example, for ❤love stories❤, you can use the following style:
---
Style: pink-light
...
You can write the following YAML at the top of your document to make it show a different style every time you open your note:
---
Style: random
...
You can make only light or dark styles switch on randomly:
---
Style: random-light
...
or
---
Style: random-dark
...
Appbar color(app颜色自适应设置)
Appbar YAML. If you use a user style and you want the application bar have a specific color, you can use the YAML as follows:
---
Appbar: blue
...
Note: use one of the material colors corresponding to a theme.
View mode fonts(视图模式字体)
Use Yaml to provide path to a local font in an individual file, fo example:
---
Font: file:///storage/.../HelveticaNeue Light.ttf
...
Setting themes as defaults(设置默认主题) ☆
You can use a name of the style to set it as default instead of the standard CSS styles.
For example, if you wish the bluegrey style to be used as the default night style, go to the Preferences > CSS Styles > Night Style, delete the whole style text, and write there bluegrey. After you exit the Preferences, this field will automatically be filled with the bluegrey style. (Note: Premium function).
Disabling theme YAMLs(禁用YMALs主题)
If you provided style YAMLs in all of your notes, and after some time, you feel tired of so many colors, you can turn off the material color styles in the Preferences > YAML preamble > Allow styles.
In this case, only the default 5 styles will be working (day, night, white, black, user).
All available YAML properties(所有可用的 YAML 属性)
| YAML | Meaning |
|---|---|
| appbar:blue | Sets a material color for the application bar |
| back:filename | (deprecated) |
| code:highlight | (deprecated) |
| code:none | Do not highlight codeblocks |
| date:2016-11-20 3 | Show this date at the top |
| Font: file:///storage/ … /HelveticaNeue Light.ttf | Setting a font for the view mode |
| heading:autonumber | Autonumbering headings from level 2 |
| heading:totop | Tapping on a heading scrolls the page to top |
prerender:| |
Preprocessing in a document |
| style:black | Force black style |
| style:day | Force day style |
| style:night | Force night style |
| style:white | Force white style |
| style:user | Force user style |
| style:nostyle | Turn off any style in the document. You can provide an inline style then. |
| style:file.css 3 | Use the file.css from the current directory |
| style:http://../style.css | Use style from Internet |
| style:file:///../style.css | Specify absolute link to the style |
| title:some_name 3 | Generate title. Can be turned off via Preferences |
| toc:some_name 3 | Generate Table of contents |
| toc-style:inline | Place ToC in one centered line |
| uses:abc | Turn on ABC Music Notation plugin. See help for advanced users. |
| uses:mathjax | Turn on MathJax plugin. NB: The plugin is cached from the Internet. Due to its high weight, it was not included in the app. See help for advanced users. |
Reminder:
To use several values for one property, write:
---
heading:
 -autonumber
 -totop
...
Miscellaneous(混杂的/其他)
Print PDF(PDF 打印)
Create pdf documents from the current view using Android’s standard pdf printer. To do that, go to Menu->Print PDF. The program first prepares the view and then offers to send it to the pdf printer.
NOTA BENE: This function is available only with Android 4.4 and above.
JQuery(支持jQuery库)
- JQuery library is included for writing extended javascripts in documents.
Keyboard shortcuts for Edit Mode(编辑模式下的快捷键)
Standard English keyboard. Tested on a bluetooth keyboard “Genius” and on-screen “Hacker’s keyboard”.
| Kbd shortcuts | Action and mnemonic |
|---|---|
| Ctrl+A | Select All |
| Ctrl+B | Bold |
| Ctrl+C | Copy |
| Ctrl+D | Insert Date |
| Ctrl+E | Strikethrough (Erase) |
| Ctrl+F | Insert Font Color tag <font color="red"></font> |
| Ctrl+G | Open Gallery to insert picture |
| Ctrl+H | Highlight |
| Ctrl+I | Italic |
| Ctrl+J | Tab (Jump 4 spaces) |
| Ctrl+K | Hide / show symbol bar (Keyboard) (Beware not to lose your Symbol Bar!!!) |
| Ctrl+L | Select Line |
| Ctrl+M | Insert from shared text or template Buffer (iMport) |
| Ctrl+N | Insert aNchor with a Name <a id="name"></a> |
| Ctrl+O | sOrt selected lines (Reverse sort is available only through the long-tap on the on-screen symbol bar. To select several lines, use Ctrl+L) |
| Ctrl+P | Preview and Print |
| Ctrl+Q | Cancel edit (Quit - press button twice!) |
| Ctrl+R | Regex Replace |
| Ctrl+S | Save and exit edit mode |
| Ctrl+T | Insert Table |
| Ctrl+U | Underline |
| Ctrl+V | Paste (Paste is Very close to the Cut button) |
| Ctrl+W | Redo (Above the undo button) |
| Ctrl+X | Cut (eXtract) |
| Ctrl+Y | Insert codeblock (cYber-language) |
| Ctrl+Z | Undo (Undo all my errorZ and miZtakes) |
Additional shortcuts(附加快捷键)
| Kbd shortcuts | Action |
|---|---|
| Ctrl+5 | Jump to the top of the document |
| Ctrl+6 | Jump to the bottom of the document |
| Ctrl+Shift+C | Alternative insert Codeblock |
| Ctrl+Shift+F | Insert Footnote |
| Ctrl+Shift+H | Show Help |
| Ctrl+Shift+S | Insert Superscript |
| Ctrl+Shift+Z | Alternative Redo button (See Ctrl+W) |
NB: Soft keyboards may not support some keys.
Show / hide Symbol bar(显示/隐藏 符号条)
If you work with a keyboard, you can hide the Symbol bar. Most of its functions are available through shortcuts. To hide it, uncheck the option at: Menu - Preferences - Symbol bars - Show symbol bar
To show or hide it while working, press Ctrl+K.
______________
Footnotes(脚注)
The symbol bar reserved words are:
- ANCHOR
- BOLD
- CANCEL
- CODEBLOCK
- COPY
- CUT
- DATE
- FOOTNOTE
- HELP
- HIGHLIGHT
- IMG
- ITALIC
- PASTE
- PRINTPREVIEW
- QUICKSELECTION
- REDO
- REGEXREPLACE
- SELECTALL
- SELECTLEFT
- SELECTRIGHT
- SORTLINES
- STRIKETHROUGH
- SUPERSCRIPT
- TAB
- TABLE
- TOBOTTOM
- TOTOP
- UNDERLINE
- UNDO
The U.S. Government announced that AES could be used to protect classified information. Source
Author kuleyu
LastMod 2018-03-25